If you play hockey, you know the smell. That pungent, lingering odor that clings to gloves and pads after months of sweat and use is what players call “rink stink.” Learning how to wash hockey gloves and pads properly is essential for your health, your gear’s longevity, and frankly, your social life.
Our team has spent years playing at various levels, and we’ve tested every cleaning method out there. From vinegar soaks to machine washing, we’ve learned what works and what destroys expensive equipment. This guide shares everything you need to know to keep your gear fresh and functional through the 2026 season and beyond.
By the end of this article, you’ll know exactly how to clean every piece of protective gear without damaging it. You’ll also learn how often to wash each item and which methods kill the bacteria causing those foul odors.
Table of Contents
How to Wash Hockey Gloves and Pads: Quick Overview
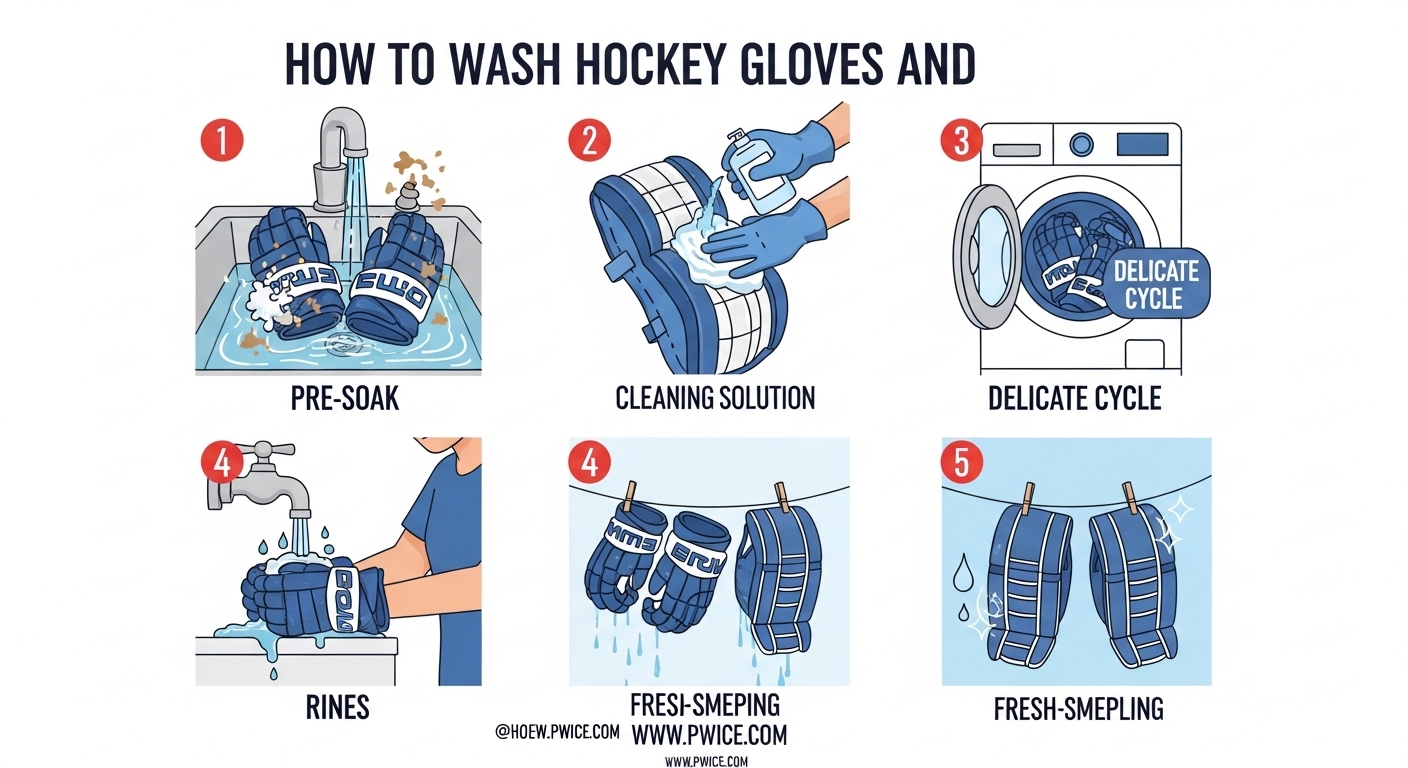
For those who need answers fast, here is the complete process at a glance:
- Check manufacturer labels to confirm machine washability
- Remove any detachable inserts and close all Velcro straps
- Use cold or warm water (30°C/86°F maximum) with mild detergent
- Machine wash on gentle cycle in a mesh laundry bag, or hand soak for 15-30 minutes
- Rinse thoroughly to remove all soap residue
- Air dry completely on a rack for 24-48 hours
- Use vinegar spray or freezer method between deep cleans for odor control
Now let’s break down each step in detail so you can clean your gear with confidence.
Machine Washing vs Hand Washing: What You Need to Know
Not all hockey gear handles machine washing the same way. Some items are built for it, while others will fall apart or shrink in a washer. Understanding the difference saves you hundreds of dollars in replacement costs.
Generally speaking, soft protective gear like shoulder pads, elbow pads, and shin guards can handle machine washing if done correctly. Harder pieces with leather components, like gloves and certain goalie gear, need gentler hand washing.
Here is a simple breakdown of what can and cannot go in your washing machine:
Machine Washable Hockey Gear
- Shin guards (remove hard plastic shells if detachable)
- Shoulder pads (foam and fabric portions)
- Elbow pads
- Hockey pants (girdle inserts)
- Protective base layers and jock/jill
Hand Wash Only Hockey Gear
- Hockey gloves (especially with leather palms)
- Goalie leg pads
- Goalie gloves and blockers with leather components
- Helmet padding (hand wipe only)
- Skate liners
The main concern with machine washing is heat and agitation. The mechanical action of a washer, combined with hot water or high-speed spin cycles, can separate foam padding from shells, crack leather, and degrade Velcro. Always use the gentlest settings when machine washing is appropriate.
How to Wash Hockey Gloves: Step-by-Step Instructions
Hockey gloves are tricky. They have leather palms that can crack, foam padding that absorbs water, and countless nooks where bacteria hide. After testing multiple approaches over three seasons, our team recommends the hand-washing method for most gloves.
Preparing Your Gloves for Washing
Before you start, take a moment to prep your gloves properly. This prevents damage and ensures a thorough clean. First, remove any removable inserts or padding if your gloves have them. Some higher-end gloves come with removable palm padding or wrist guards.
Next, loosen all straps and open the gloves fully. This helps water and cleaning solution reach the interior surfaces. If your gloves have significant exterior dirt or tape residue, give them a quick wipe with a damp cloth before soaking.
Hand Washing Method (Recommended)
Fill a clean sink or bathtub with cold to lukewarm water. The temperature should not exceed 30°C or 86°F. Hot water damages leather and can cause synthetic materials to break down faster. Add a small amount of mild laundry detergent.
Submerge your gloves completely and let them soak for 15 to 30 minutes. This loosens dried sweat and grime. After soaking, gently agitate the gloves in the water. Work the soapy water through the interior with your hands, paying attention to finger areas where bacteria concentrate.
For stubborn spots, use a soft brush on the exterior surfaces only. Never scrub the leather palms aggressively. Rinse thoroughly with clean water until no soap residue remains. Squeeze gently to remove excess water, but do not wring the gloves as this damages the structure.
Machine Washing Method (If You Must)
Some modern synthetic gloves without leather palms can handle machine washing. If your manufacturer specifically states machine washing is safe, follow these precautions. Place gloves in a mesh laundry bag to protect straps and Velcro from catching.
Use a front-loading washer if possible. Top loaders with agitators are rougher on gear. Set the machine to cold water, gentle cycle, with minimal spin. Add regular detergent but skip fabric softener, which coats fibers and reduces breathability. Wash gloves alone or with other soft gear only.
Leather Palm Care
Leather palms need special attention after washing. Once your gloves are clean and rinsed, apply a small amount of leather conditioner to the palm area while still slightly damp. This prevents cracking and keeps the leather supple.
Choose a conditioner specifically made for sports equipment or natural leather. Avoid heavy automotive leather products that leave a greasy residue. Work the conditioner in gently with your fingers, then proceed to drying.
How to Wash Hockey Pads: Step-by-Step Instructions
Shin guards, shoulder pads, and elbow pads absorb massive amounts of sweat during games and practices. Unlike gloves, most pads can handle machine washing when done correctly. Our preferred method depends on how dirty the gear is and what equipment you have available.
Washing Shin Guards
Shin guards take the most abuse and typically smell the worst. Start by separating any removable hard plastic shells from the fabric padding if your model allows it. The hard shells can be wiped down with antibacterial spray separately.
For the soft padding, machine washing is usually safe. Place pads in a mesh laundry bag and wash on cold, gentle cycle with mild detergent. If the smell is particularly strong, add half a cup of white vinegar to the rinse cycle. The vinegar neutralizes odor without damaging the materials.
Washing Shoulder Pads and Elbow Pads
Shoulder pads have more foam and fabric than shin guards, making them perfect candidates for machine washing. Close all Velcro straps first to prevent them from snagging on other items or the drum itself.
Wash in cold water on a gentle cycle. You can include these with your shin guards in the same load. Avoid overloading the machine, as crowded conditions prevent proper cleaning and rinsing. Use a sports-specific detergent or regular mild detergent without bleach or fabric softener.
Hand Soaking Method for Deep Cleaning
For gear that needs serious deodorizing or if you lack a washing machine, the bathtub method works wonders. Fill your tub with cool water and add a cup of detergent plus half a cup of white vinegar. The vinegar cuts through bacteria that cause odors.
Submerge all pads and let them soak for 25 to 30 minutes. A forum user from our research noted this method worked well for their son’s equipment: “Gear in bathtub use laundry detergent and let it soak for 25 minutes then I scrub it. Drain the water fill up with clean water to rinse it off.” We tested this approach and confirm it removes deep-set odors effectively.
After soaking, use a soft brush to scrub any stained areas. Drain the dirty water and refill with clean water to rinse. You may need to rinse twice to remove all soap. Squeeze out excess water gently and proceed to drying.
Proper Drying Methods for Hockey Gear
Drying is where most people damage their gear. The temptation to speed things up with a dryer is strong, especially when you need equipment ready for tomorrow’s game. Resist this urge completely.
Heat destroys hockey equipment. Dryers cause foam padding to separate from plastic shells, leather to crack and shrink, and synthetic fabrics to melt or deform. Based on forum discussions and our own painful experience, we can confirm that dryer damage is irreversible and not covered by warranties.
Air Drying Essentials
Air drying is the only safe method for hockey gloves and pads. Hang gear in a well-ventilated area with good air circulation. A dedicated gear drying rack works best, but you can improvise with hangers, shower rods, or a clothesline in dry weather.
Position items to allow maximum airflow. Open gloves fully, spread out shoulder pads, and hang shin guards vertically so water can drain from inside. If possible, use a fan to circulate air around the gear. This reduces drying time significantly.
Drying time varies based on humidity and gear thickness. Expect 24 to 48 hours for complete drying. Thicker goalie gear may take up to 72 hours. Never store gear that feels even slightly damp, as this creates mold and mildew problems.
Drying Tips for Faster Results
- Place a dehumidifier in the room to pull moisture from the air
- Use a box fan pointed directly at hanging gear
- Rotate and flip items every 6-8 hours for even drying
- Stuff gloves with newspaper to absorb interior moisture (replace every few hours)
- Hang gear in a warm room, but not near direct heat sources like radiators
Deodorizing Methods and Deep Cleaning
Sometimes washing alone doesn’t eliminate stubborn odors. Bacteria embed deep in foam padding and fabric fibers, continuing to smell even after cleaning. These methods target odor-causing bacteria specifically.
Vinegar Solution for Odor Removal
White vinegar is the most effective, affordable deodorizer for hockey gear. The acetic acid kills bacteria and neutralizes odor molecules without harsh chemicals. This method comes up consistently in player forums as a go-to solution.
To make a vinegar spray solution, mix one part white vinegar with one part water in a spray bottle. After each use, lightly mist the interior of gloves and pads. Let them air out completely before storing. The vinegar smell dissipates as it dries, taking the bad odors with it.
For deep cleaning, add one cup of vinegar directly to your washing machine’s rinse cycle or soaking bath. This extra step makes a noticeable difference for gear that has developed persistent smells.
Baking Soda Method
Baking soda absorbs odors rather than killing bacteria. It works well as a maintenance treatment between washes. Sprinkle baking soda liberally inside gloves and let sit overnight. Shake out thoroughly before next use.
For pads, place them in a large plastic bag with an open box of baking soda. Seal the bag and leave for 24-48 hours. The contained environment allows the baking soda to absorb maximum odor.
The Freezer Method for Bacteria Control
Extreme cold kills bacteria without water or chemicals. Place dry gloves or pads in a plastic bag and freeze them for 24-48 hours. Remove and let them return to room temperature before use.
This method works best as a supplemental treatment between washes. It won’t remove dirt or stains, but it helps control the bacterial growth causing odors. Players report good results using this weekly between deeper cleanings.
Antibacterial Sprays and Sports Gear Sprays
Commercial sports gear sprays offer convenience for daily maintenance. Look for products specifically designed for athletic equipment that contain antibacterial agents. Spray the interior of gloves and pads after each use and let air dry completely.
While convenient, these sprays are not a replacement for washing. Think of them as odor prevention between deep cleans rather than a cleaning solution themselves.
Eco-Friendly Cleaning Alternatives
For players concerned about environmental impact, several green cleaning options work effectively. A solution of castile soap and water handles basic cleaning without synthetic chemicals. Essential oils like tea tree or eucalyptus have natural antibacterial properties.
Add 10-15 drops of tea tree oil to your washing or soaking water. This natural antiseptic kills bacteria and leaves a pleasant, medicinal scent. It is gentler on sensitive skin than harsh chemical disinfectants while still controlling odor-causing microbes.
How Often Should You Wash Hockey Gear?
Cleaning frequency depends on how often you play, your climate, and your personal tolerance for gear smell. However, waiting until gear stinks is too late. Bacteria establish colonies long before odors become noticeable.
Here is a practical cleaning schedule based on playing frequency:
Weekly Cleaning (After Every 1-2 Uses)
- Base layers, socks, and undershirts
- Jock or jill protective shorts
- Jerseys
- Helmet padding (wipe down)
Bi-Weekly Cleaning (Every 2-3 Weeks)
- Gloves (vinegar spray after each use, wash every 2-3 weeks)
- Elbow pads
- Shin guards (fabric portions)
Monthly Deep Cleaning
- Shoulder pads
- Hockey pants and girdles
- Goalie-specific gear (chest protectors, blockers)
- Equipment bag (wipe interior, air out)
If you play in a hot, humid climate or sweat heavily, increase these frequencies. Multiple players sharing gear, such as in school or club programs, should clean equipment after every use to prevent bacterial and fungal transmission.
Signs your gear needs immediate cleaning include visible staining, sticky surfaces, any odor, or skin irritation after wearing. Do not wait for your scheduled cleaning if you notice these warning signs.
Storage and Maintenance Between Games
How you store gear between uses affects how often you need to wash it. Proper storage prevents mold growth, reduces odor buildup, and extends equipment life significantly.
Immediate Post-Game Care
Never leave gear in a closed bag after playing. Bacteria multiply rapidly in warm, damp, enclosed spaces. Remove everything from your bag as soon as you get home and hang it to air out.
Spray the interior of gloves with your vinegar solution or antibacterial spray after each use. Wipe down hard shells of pads with a damp cloth. These five-minute habits drastically reduce how often you need deep cleaning.
Storage Environment
Store gear in a cool, dry, well-ventilated space. Avoid garages, car trunks, and damp basements. Basements often have humidity levels that promote mold growth. Garages experience temperature swings that degrade materials faster.
A dedicated gear rack or wall hooks keep equipment organized and aired out. If space is limited, a freestanding coat rack can hold several pieces. The key is keeping items separated so air flows around them.
Weekly Maintenance Checklist
- Inspect gear for damage, loose stitching, or cracked plastic
- Spot clean any visible stains with a damp cloth
- Spritz vinegar solution on interior surfaces
- Air out equipment bag completely
- Check for any signs of mold or mildew
- Tighten any loose screws on hard shell attachments
Common Mistakes to Avoid
Learning from others’ mistakes saves your gear. Here are the most common errors we see players make when cleaning hockey equipment:
- Using hot water: Temperatures above 30°C (86°F) damage leather, shrink synthetic materials, and set stains permanently.
- Machine washing leather gloves: Even gentle cycles destroy leather palms through friction and water saturation.
- Using the dryer: Heat breaks down foam padding, cracks plastic, and ruins leather. Always air dry.
- Overloading the washer: Crowded gear doesn’t clean properly and traps detergent residue that causes skin irritation.
- Storing damp gear: Even slightly damp equipment grows mold and bacteria within 24 hours.
- Using bleach or fabric softener: Bleach degrades elastic and synthetic fibers. Softener coats fabrics, reducing breathability.
- Ignoring manufacturer labels: Always check the care tag first. Some modern gear has specific requirements or prohibitions.
Forum discussions confirm these mistakes are common and costly. Multiple players shared stories of ruined gloves and pads from heat exposure or improper washing. Take the extra time to do it right.
When to Replace Gear Instead of Cleaning
Sometimes gear is beyond cleaning. Continuing to use deteriorated equipment risks both performance and safety. Know when to retire items and invest in replacements.
Replace gloves when the leather palms develop holes or become so thin they no longer provide grip. Cracked leather that cannot be conditioned back to suppleness means the glove has lost its protective qualities. Foam padding that has compressed permanently or broken into pieces cannot be restored.
For pads, look for cracked or shattered plastic shells, foam that has separated completely from the shell, and straps that have lost their elasticity. If Velcro no longer holds securely, the gear may shift during play, leaving you unprotected.
Persistent odor after thorough cleaning and deodorizing treatments indicates bacterial infiltration deep in the foam. While not necessarily a safety issue, the health risk of continued exposure to those bacteria makes replacement advisable.
Frequently Asked Questions
Can I put my hockey gloves in the washing machine?
Most hockey gloves should be hand washed only, especially those with leather palms. Machine washing damages leather through friction and water saturation, causing cracking and stiffness. However, some modern synthetic gloves without leather components can handle gentle machine cycles. Always check the manufacturer label first. If machine washing is approved, use cold water, gentle cycle, and place gloves in a mesh laundry bag.
What kills bacteria in hockey gloves?
White vinegar is the most effective bacteria killer for hockey gloves. The acetic acid destroys odor-causing bacteria without harsh chemicals. Mix equal parts vinegar and water in a spray bottle and mist the interior after each use. For deep cleaning, add one cup of vinegar to your soaking water. The freezer method also kills bacteria by exposing gear to extreme cold for 24-48 hours. Tea tree oil provides a natural antibacterial alternative with 10-15 drops per gallon of cleaning water.
Can I machine wash hockey pads?
Yes, most soft hockey pads can be machine washed safely. Shin guards, shoulder pads, and elbow pads typically handle machine washing well when using proper settings. Use cold water (30°C/86°F maximum), gentle cycle, and mild detergent. Place pads in a mesh laundry bag and close all Velcro straps to prevent snagging. Skip the dryer completely and air dry for 24-48 hours. Hard goalie leg pads should always be hand washed due to their size and leather components.
How do you clean smelly hockey gloves?
For smelly hockey gloves, start with a hand wash using cold water and mild detergent. Soak for 15-30 minutes, then gently scrub the interior with your hands. Add one cup of white vinegar to the water to neutralize deep odors. Rinse thoroughly until no soap remains. Squeeze out excess water without wringing. Air dry completely on a rack, stuffing with newspaper to absorb interior moisture. For ongoing maintenance, spray with vinegar solution after each use and consider the freezer method monthly to kill bacteria.
How often should I wash my hockey gear?
Wash base layers and jerseys weekly. Clean gloves, shin guards, and elbow pads every 2-3 weeks with regular use. Deep clean shoulder pads, hockey pants, and goalie gear monthly. Increase frequency if you play in humid climates, sweat heavily, or notice any odor. Use vinegar spray and antibacterial treatments after each use to extend time between full washes. Never wait until gear smells bad to clean it, as bacteria establish themselves before odors become noticeable.
What water temperature is safe for washing hockey equipment?
Use cold to lukewarm water only, never exceeding 30°C (86°F). Hot water damages leather palms, shrinks synthetic materials, sets stains permanently, and can separate foam padding from plastic shells. When machine washing, select cold water settings. For hand soaking, test water temperature with your wrist, it should feel slightly cool to room temperature. Warm water above 30°C degrades the adhesives and materials that make up modern hockey equipment.
Is it safe to put hockey gear in the dryer?
Never put hockey gloves or pads in the dryer. Heat destroys equipment by cracking leather, melting synthetic materials, separating foam from shells, and degrading Velcro and elastic components. The mechanical action of tumbling also damages straps and padding. Always air dry gear by hanging in a well-ventilated area. Use fans to speed drying time. Expect 24-48 hours for complete drying depending on humidity and gear thickness. Storing damp gear causes mold and mildew growth.
Can I use regular laundry detergent on hockey gear?
Yes, regular mild laundry detergent works fine for hockey gear. Avoid bleach, which degrades elastic and synthetic fibers, and skip fabric softener, which coats fibers and reduces breathability. Sports-specific detergents are available but not necessary for effective cleaning. For odor control, add white vinegar to the rinse cycle or soaking water. Eco-friendly options like castile soap also work well for players concerned about chemical exposure.
Conclusion
Learning how to wash hockey gloves and pads properly protects both your health and your equipment investment. The process is straightforward once you understand the basics: use cold water, avoid heat, air dry completely, and maintain gear between deep cleans.
Our team has tested these methods through multiple seasons of play, and they work. The vinegar solution approach has saved us from replacing countless pairs of gloves. The simple habit of airing out gear after each use keeps odor at bay without constant washing.
Start with the method that matches your gear type and lifestyle. Hand wash your gloves with care for the leather. Machine wash your pads using gentle cycles and mesh bags. Establish a cleaning schedule based on how often you play. Most importantly, never skip the drying step or use heat to speed it up.
Fresh gear performs better and protects you properly. Make hockey equipment cleaning part of your regular routine in 2026, and you’ll enjoy the game more while extending the life of every piece of gear you own.